Wireguard - fast, modern, secure VPN tunnel

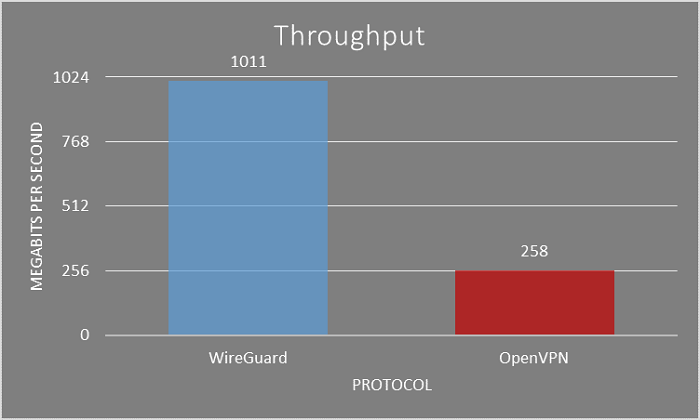
Wireguard is a VPN(virtual private network) protocol that allows you to connect to a network from a registered device outside of it. Once the connection is established, it's as if you are browsing your LAN. VPNs to home or business networks aren't anything new, but the recent rise in popularity and usage in VPNs, as well as Wireguards directly into the Linux Kernel starting with version 5.6 has brought even more attention to it over the last few months. OpenVPN used to be the defacto VPN tunnel service used, but Wireguards performance blows it out of the water so far. Here's a chart from vpnranks.com that goes over their analysis of the throughput difference between Wireguard and OpenVPN.

Picture taken from vpnranks.com, articled linked above
Wireguard can actually max out the gigabit connection without maxing out the CPU. And anyone who has tried using OpenVPN knows that it's actually very CPU intensive, many people choose their pfsense builds based on CPU throughput under OpenVPN. This is great for many reasons, as knowing that running a low power server on the cloud would not be bottlenecked by the CPU if you were using it as a VPN, meaning you can spin up a lower power server on the cloud for the same purpose and save alot of money over time.
So what's the best way to deploy Wireguard? It usually depends on your setup. If you are running a hypervisor like ESXI or Proxmox already, spinning up a VM dedicated to Wireguard is a viable option. Another option is to deploy it on a separate device such as a Raspberry Pi or another type of small maker board. Since as we've established Wireguard is not a CPU intensive process, the small ARM chips on the Pi are more than enough to handle this.
I had a Pi 3B+ that I grabbed on sale from Microcenter awhile back so I went with that. It also supports USB booting out of the box which I like, so I formated a USB drive and after 2 restarts it booted right in. After changing the password(never leave the default password on a Raspberry Pi) and changing the username to obscure it abit from whatever roaming bots that try to communicate with it since I will be opening a port for Wireguard, it was ready to go.
PiMyLifeUp has a very simple guide that I used that they recently published, and i'm gonna just link it here since it does a great job of just getting Wireguard setup on a Pi very quickly. After setting it up and creating a profile to use on my Android phone, I grabbed the Android app and scanned the QR code to import the key. After fixing a port forward error on my router where I opened a TCP port instead of UDP, my connection was made!
Wireguard is not perfect though. Even it's creators have commented that it wasn't necessary designed with large commercial usage in mind. VPN providers like NordVPN, ExpressVPN, PureVPN, etc. There are concerns about privacy as by nature WireGuard does not dynamically assign IP addresses, so it logs and stores any IP address that connects to it. What this means that if you were to use the NordVPN implementation they have to take extra measures to ensure your connecting IP is obscured, as your IP being permanently logged is a pretty bad idea when using a VPN who has servers you have no access or control over. In this deployment we are using it less so to connect from our home network to the broad internet through a secure tunnel, but from the broad internet(in my case over a mobile network) to a home network through a secure tunnel. As long as there are no vulnerabilities with Wireguard itself, it's as secure as my home network.

